Showing posts with label display. Show all posts

FREE Printable Alphabet Flash Cards

As we tend to do with our first child, I spent a lot of time with Hugh when he was little, teaching him his colours, his shapes, and of course - the alphabet... Not so much with Noah. Funnily enough I haven't the time! But one thing I have found, is that a set of these are super handy. Not only are they useful for wee ones, but they come back into their own at pre-school age when kiddos start learning to put letters and sounds together and they want to start figuring out how to spell phonetically.

This set of Alphabet Flash Cards isn't only cute cute cute - it's FREE FREE FREE! Just click this link to download your very own set. Print them onto heavy card for a longer lifespan or laminate them if you can so they can be wiped clean, OR if you're feeling creative, they'd make a great display either framed or hung as bunting! Go ahead, play, create and learn!

How to: Make your wee one feel special

I just adore this idea! Blackboard paint is my finish-du-jour at the moment (remember the boys beds?), and this treatment is a gorgeous way to display kids artworks. Not only are they neat and tidy (much better than my magnets on the fridge!) but this would just make any kid feel like a budding Picasso!

Gallery wall inspiration

With only one task left to be done before I can call the boys playroom complete, I'm on the hunt for gallery wall inspiration and these are getting major ticks! 
Loving this gallery wall. The black and white theme is stunning, but I think it's a bit uptight for the kids. Better for the hall this one is... Irrelevant but how good is that paint colour on the wall?

This is better. The eclectic mix is exactly what I would like to do...

More eclectic...

Ah yes. Only thing better than eclectic? Eclectic on a dark wall...

Nice overall shape... and light... and colour palette...

Love the ampersand in there.

Cheap Ikea Cheats...

Remember the $2.50 Bookshelves I told you about a while ago? Well, I've just found 2 more fantastic ideas - let's call them "alternative uses for Ikea designs"...

1: The car storage strip
At $19.99 each, these Asker Magnetic Knife Racks from Ikea make excellent car storage - and what a great feature if you ran them all around the room like a low slung picture rail....?

2: The Vertical Jewellery Box
Take one basic timber cutlery tray - available at Ikea for around $15. Add some pretty papers and vintage drawer knobs to hang your jewels from... Voila!
 Via

Kids art that looks good

Who knew those multi-coloured scribbles could look so good? As always, it's all in the way it's presented. This kids art display idea from La La Lovely works so well. I'd love to have such cheerful art to look at above my dear Mr Mac...
This one's great too. Another tried and true design philosophy "things always look better really small or really big". We always found this to be the case with our miniature page printouts in the olden golden Dolly days... Seems it applies to scribbly unidentifiable drawings too!

Craft Room LUST....

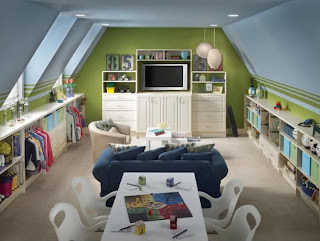
Twice now since christmas I've tried to re-organize the boys playroom. And twice I have failed. Beaten by the limitations of the furniture we have in there and the way the room is set up. But since finding these three amazing spaces I'm feeling a little buoyed by the possibilities and a little bit inspired to give it one more shot...
The lamp shade cluster is just so cute and clever. I think I may need to steal this idea. 

Ikea's Skimra shades like these are only $4.99 each and it would be really easy to get a similar effect to this by glueing strips of contrasting coloured ribbon around the top and bottom edge of each shade and tying them into a group. If you were feeling particularly handy you could even put a fitting into one or two of them and making it into a functioning light. Plain fittings like these ones below from Ikea are under $15.
Then there was this. How good would those drawers be?!! One huge deep one for all the bottles of paint that leak when you have to lie them down and all those shallow wide ones for project cardboard and paper. The giant sized paintbrush and palette set the tone for the space and the wire display setup is functional and almost invisible.
While I love this last one for it's child-sized furniture and acres of storage, I'm not convinced carpet in the craft room would work with my two human tornadoes... 
And it would all look so much nicer with these sofas instead don't you think?
Craaftroom images via Real Simple

Pretty peachy prints...

I love Peachie. I love the prints - I even love the site design. Peachie is the creation of stylist Julz who, during her maternity leave with her first baby, decided to have a go at being behind the camera for a change. Well, it's a good thing she did. The world is a more beautiful place with gorgeous prints like these adorning the walls of children's bedrooms and play spaces...

All of Julz's prints are limited edition and she also does private commissions. So if you've got an heirloom toy or a special christening gown that great-granny hand embroidered way back when, have a look here, Julz can create a stunning image of your keepsake for you to treasure and decorate your walls... Nice huh?


Kids prints on carpet!!!


Remember my Kids In Print post about Art Eater (the company that creates gorgeous coffee table books and shadow boxed prints out of your kids artworks)? Well this company goes one better. Bavarian company Carpetzz can ingeniously turn your little ones masterpiece into a carpet! All pieces are made from 100% New Zealand wool hand dyed and tied to match your artwork as closely as possible. At 150 Euro (that's roughly $200 Aussie dollars) per square metre plus shipping (which bear in mind might get expensive due to the weight of a rug) it's fairly reasonable for what you're getting.
Check out how great they are! (The ones on the left are the drawings - the right are the carpets).


Another way to save your kids artwork

If the Art Eater idea from Kids in Print didn't tickle your fancy as ways to preserve your children's artworks, maybe this one will hit the spot? Now, thanks to Formia Design you can have that delightful portrait made into a unique piece of jewellery! Too cute! They make pendants, necklaces, key chains and even bookmarks out of sterling silver based on the drawing you submit! I know! Right? The prices aren't ridiculous either. Not any more than I would expect to pay for any custom designed piece really - starting at around $125US for a small pendant and going up to $500 for the whole family's portraits (3 pieces)...  I'd love one of these!


Via 


A bookshelf for $2.50!???

Oh, Oh, Oh! Check out this clever idea from OhDeeDoh
It's a bookshelf for forward facing book displays! 
No, wait! It's a spice rack from Ikea! Now that's clever....
I feel a trip to Ikea coming on...

Make it: Girly ABC's

Oooooh... Here's a little project I've been working on. Soooo pretty! Don't the pinks and reds look great with the Woodfern Brick fabric? I love doing these! I did this one to to show on our site and for a little competition coming up in January - stay tuned for more information on that one, I promise you'll love it!

I'd like to do one of these covered in wallpapers. Lots of pretty different patterns - 27 would be ideal - one for each character! And contrasting patterns for the profiles of each letter too. I wonder what else I could do with them - if you have any ideas share them! Or send me a photo!

DIY of the week: Calendar Wall


Here's a super easy craft project you can knock over in a weekend and it'll help you keep track of the families engagements and activities. We love a bit of organisation don't we?

All you need it a tin of blackboard paint, a little white paint (leftover ceiling paint will do - but check to make sure you're mixing acrylic with acrylic or enamel with enamel or you'll end up with a marble wall - which could be good, but not what we're trying to do...), a ruler, a pencil, a roller and chalk.

1. To set up you'll need to measure out your grid and mark it on the wall using your ruler and pencil. Remember the bigger your family schedule - the bigger your squares will need to be to contain all that info. Whatever the space you're dedicating to the project divide the width by 7 (for the days of the week), and divide the height by the number of rows you want. You'll need at least 5 rows to fit all the dates for each month, but this example has made 6 rows, using the bottom row as a spot to stick notes, invitations, permission slips etc.

2. Hardest part is done! Using a roller paint the entire square with blackboard paint. (Don't worry - you'll still be able to see the pencil markings through the paint in the right angled light).

3. Measure out a small amount of blackboard paint and mix in enough white paint to make a dark grey.

4. Carefully roller this new colour onto randomly selected squares. (you can follow this example for where to put each shade of grey if you aren't feeling confident about ad-libbing)

5. Follow steps 3 & 4 two more times to create another 2 lighter shades of grey and paint them on until you have a similar grid as the one above.

6. Once it's all dry, add a border of straight-up black blackboard paint to create a frame and a spot to write in the days of the week.

7. With chalk, add your dates and activities!

You can customize this design to suit your family too. You might want to add a black panel down one side for the weekly shopping list, or a list of dates for the birthdays of family and friends so nobody is ever forgotten or missed! This project would be as big a success in the office as in the kitchen too.

I'd love to see yours if you decide to give it a go! I wish I had a blank wall in my kitchen so I could do one! I guess cupboards are good too...

Project found via Living Etc

More bed-bingeing


Oh my giddy aunt! It's a loft bed with storage dream! 
I LOVE these! I love so many things about this room...
*More nanna rugs! Possibly even more gorgeous than the vintage find in Style to steal... 
*The locket mirrors above each bed.
*The storage the storage the storage...
*The beech flooring. It gives such a sense of light and space.
*Pale yellow walls (not normally but...) note how the pale timber sits so beautifully against this hue. 

Dulux do a really good one similar called Camomile Cream


Looks good in an adult space as well. And there's no question it would work well in a nursery...

Dreamy room does have one minor drawback though. 
It leads me back down the path of the $30,000 attic conversion. 
If this was our forever house I'd consider it. But it's not. I have dreams about a californian bungalow, on a corner block near the water. (sigh) But we can go into that another time...

Here's one more stunning bunk solution for good  measure...
Which one's your favourite?


A crafty, joyful, wrap!


This is the Noosh Gigi Alphabet which I originally designed for Hugh's and Noah's bedroom. (I added a mirror to the "o" for this one.) Anyway... I saw a craft project (sorry, can't remember where) that used MDF letters to spell festive words and rather than paint them, they were covered with Christmas paper. Super easy. Super cute. I couldn't resist so I thieved a few letters from the boys wall to create....


...this. See? Decorexic. I can't help myself! I have a compulsive urge to repaint, add to and change things constantly.

I chose some Christmas wrapping paper with bright graphics christmas trees all over it. All you need to do is spray one side of your MDF letters with spray adhesive (available from craft shops and hardware stores), then position it face down on the back of your christmas paper. Using a stanley knife or scalpel if you happen to have one (they're very handy for craft), carefully cut around the edges of your MDF letters using the edge as a guide. Voila!

It now hangs proudly in our living room. I love the idea of using the alphabet as a kind of "stock" of letters that I can borrow from for different projects. (Sorry boys. You'll have it all back on your wall eventually.)

I've been working on another version that I'll share with you soon...

Decorexia

Decorexia. Defn: A compulsive urge to redesign/repaint/reconfigure one's environment often or even constantly in extreme cases... It's my new favourite word and I'm guilty, guilty, guilty. 

Style to steal!

It was only a few days ago that I introduced you to Etsy store PomLove in my post Floaty Fluffy Fings. Well, I nearly fell off my chair today when I saw this!


Can we just pause a moment to admire this gobsmackingly gorgeous mix of vintage pieces, handmade details and contemporary cool, cool, cool!!!??? It's about the bed! How much do we love the repurposed antique door casually hung to create a bedhead? Almost as much as the upcycled packing pallets repurposed to create a bed-base! With storage! Sooooo easy! Sooooo so so clever!

I really like the way they've used the mis-matched vintage picture frames to house a very personal display of photos, artworks, prints and things... The crocheted nanna rug suits the colour scheme beautifully and becomes a bit of a centrepiece in the overall look of the room. Not bad for something that can be sourced from an op shop for just a few bucks huh?

And, as I like to do, saving the best till last - notice the PomLove clusters that hang from the ceiling? This is it! This is the room where I could lie and stare at the cloudy puffs of colour floating from the ceiling, lulling me into a deep and restful (yawn) sleep....

Woah Nelly! It's Bodie & Fou


Too cute! I found this print at Bodie & Fou - another favourite online store - again in the UK (seems those Brits are striking a chord with me of late!).

While you're there, make sure you have a cup of tea in hand and check out the Bodie & Fou blog as well. Both the store and the blog are the creation of French sisters, Karine and Elodie. Both destinations will treat you to a stunning collection of children's and baby-wear, art, prints, home and fashion pieces, contemporary designer furniture along with unique and slightly quirky gifts and accessories, all delivered with very chic, French inspired styling. (It's worth a look to admire the styling alone!) And with the likes of Helena Christensen and Claudia Schiffer shopping there you'll be, at the very least, in good company...

Have a look at their recent halloween photo shoot...


Mmmmmm. See what I mean? 
Now where's my huband's credit card?

Handy salt-dough recipe


Here's an easy craft idea that'll not only keep the kids busy for an hour, but it'll double as a cheap christmas present for dad, the grandparents or anyone you like really...

You'll need
2 cups plain flour
1 cup salt (fine salt works best)
1 cup warm water
A few drops of food colouring

1. Stir the salt into warm water until dissolved.
2. Add flour and combine until mixture forms a dough.
3. Add  food colouring to achieve desired colour.
4. Shape the dough into whatever you fancy. (I've listed a few ideas below)
5. Leave your masterpiece to dry.

We made handprints (Noosh-dad goes gaga for this sort of keepsake stuff), so split our dough into two portions so that the boys could have a different colour each. You can also mould uncoloured dough and paint with acrylic paints once it's completely dry and hardened. 

This same recipe is great for making christmas decorations too. You can even decorate your finished product with glitter, buttons and jewels. Just remember if you do go down this road, it's a good idea to seal the final piece with a clear lacquer to ensure longevity.


And they now sit proudly on the floating shelf in our entrance hall. What do you think? I'd love to hear about it if you decide to give it a go! Pictures are always good to see too! Email me at tina@noosh.com.au 
Related Posts Plugin for WordPress, Blogger...