Showing posts with label make it. Show all posts

Holy bird wings batman!

"My, what lovely bird wings you have..." isn't something I often hear - but that's probably because I don't have a set of these pretty puppies! I found them over at The Beetle Shack and my favourite thing about them is....
You can make them yourself!

Hmmm, they certainly look doable! Almost easy! Uh-oh, I feel a project coming on... 
Click over here for the tutorial and let me know how you go if you give it a whirl...

Patch me pretty...

Normally not much into the patchwork thing myself. I guess I prefer to let a fabric I love "speak" for itself rather than being crowded out by a gazillion other busy patterns all butted up against eachother - but hey, that's a personal thing. But this project - well, I'm swaying....

Check out this and every other amazing project this talented little lady whips up over here.

Make it: Party Pinata

This Ice Cream Cone Pinata is a great alternative to the sometimes scary-looking syndicated types you can pick up at big department stores and party shops, and it's a great craft project to tackle with the birthday boy or girl! Click here for the instructions


Easter Craft: Decorated eggs

I love these botanical themed dyed eggs for Easter. No fussy egg blowing necessary either! You can just hard boil your eggs and then set to work on the decorative touches. Food colouring will do the trick but these ones were done with homemade natural food dyes using red cabbage, onion and cranberries. Here's how...

Simply positioned a blossom or a leaf facedown against each egg, then wrapped the egg in a four-inch square of panty hose and secured it with a twist tie. 

Doily garlands

I want to make some of these to decorate our Easter table... but which one to choose?


Make it: Easter Egg Nests

Chocolate nests

100g rice bubbles
100g milk chocolate
100g dark chocolate
75g butter
3tbs golden syrup

1. In a large, non-stick pan, melt both chocolate bars with the butter and golden syrup. Mix well.
2. Add the rice krispies into the pan and stir, coating everything evenly.
3. Spoon 5 mounds onto a tray lined with baking paper or a silicone sheet. Form a dip in the centre.
4. Refrigerate for 1-2 hours or until set. Peel the nests off, fill with chocolate eggs and serve.

Make it: Hop to it!

How good? And so so so so easy to make one of your own! 
Great to keep on hand for rainy days (like the ones they're predicting for this weekend...). 

Helpful tip: If you're using your fabric hopscotch on floorboards, polished concrete or similar, you'll need to add some non slip backing to your mat. Try drawing lines of silicone on the back of your fabric. It's cheap and works well - just allow it to dry completely before using...

A new home for my jewels...

Definitely making this...

Ikea hack: Display storage for the kiddos

Looks great doesn't it? Try the Ikea Prant box. They are raw ply so easy to paint and only $14.99 each -you could knock one of these display walls together yourself for well under $100 including the paint! All you need is a handy hubby or some basic drill skills... 

Make it: FREE Easter decorations

This is not only the cutest easter decoration I've seen - it's FREE! Follow the easy step by step...

Step 1: Choose a selection of paint chips in your favourite hues from your local hardware store. (I find kids make great partners in crime for this one - you can't keep them away from the paint chips!)

Step 2: Using a template trace out an egg shape on the back of each chip. Cut out and punch two holes in the top of each egg.

Step 3: Thread twine through your punched holes (an invisible thread would work great for this). I really like the way the colours vignette across the garland, but a random placement would work just as well - that bit's up to you!

Step 4: This is the hard bit - now you need to choose a spot to hang it up.

My feet above my head

The best ideas are often the simplest and this one is no exception. 
An easy and stylish way to create artwork for your child's room.

Celery art

Ever thought about using vegetables to print your own wrapping paper? Beyond the potato print I mean...
This is genius! No fiddly carving potatoes or lame looking smiley faces here! Just gorgeous roses...
Just genius!

Let them eat fruit

What better way to get healthy food into wee ones than to make it look like their favourite thing?
Rainbow fruit skewers. Genius I tell you. Genius!

IKEA Hack: Affordable upholstered bed!

This is a fantastic IKEA hack. Jen over at Organised Design has accomplished the impossible - an upholstered bed for under $100! The Looks great huh? And it's as easy as "pass me the staple gun". Start with an IKEA Fjellse single bed frame for $39 and you end up with this! Click here for the full how to...

Quick Creation: Bookmark Corner

Cute huh? Much nicer than a "dog-ear" creased up corner...
Make one from coloured paper, or even felt!


Weekend project: A cardboard catapult

I can't wait  to make this with Hugh. He's going to love it. For the full tutorial (not that there's much to it - couple of rubber bands, a box or two and a pencil just about covers it) have a look here...

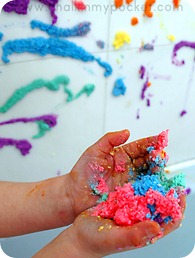
Make it: Bathtub Puffy Paint

This is my golden ticket to "Coolest Mum Alive" status - and it'll clean my bath as well!
Click on over to Chalk In My Pocket for the full step by step how to details...


Cute kids party idea

How cute's this? Ok, I know, it's supposed to be for a wedding - but who likes confetti more than kids? Imagine Fairy Party invites with a sachet of such pretty coloured sprinkles attached! And you could get them to bring the sprinkles to the party and thrown them on the birthday girl fairy, when she blows out her candles! Too cute...

Make it: Table cubby

I love this idea. You could do it with glue if you weren't big on sewing... 
I should do one... it might make me keep the dining table clean...

Make it: The pom pom post you've been waiting for.


This is the post you've been waiting for. Throw your cardboard doughnut discs in the bin. I have to admit that was the part that was holding me back - pom poms are pretty easy, yes, but these ones make the creation all the more attractive... That vase of Pom Pom Dandelions is looking better already...

Easy-Peasy Pom Poms
*Start by wrapping your yarn around the prongs of your fork (for the green pompom I wrapped 40 times around, for the red pompom I made 60 wraps) and then cut the end of your yarn.
*Cut a length of yarn 20cm or so long, and thread beneth your yarn wraps between 2nd and 3rd fork prong. Pass the other end of this length of yarn between prongs over the top of the yarn bundle. Pull both ends and tie into atight knot.
*Slip yarn bundle off the end of your fork. snip through all the loops of yarn, and roll pompom between palms to ‘fluff’. Trim any uneven ends.
*Admire pompoms.
Related Posts Plugin for WordPress, Blogger...