Make it: Sweetest NYE dip ever

I don't have a sweet tooth - every tooth in my mouth is sweet. So this Cookie Dough dip is right up my alley. Michelle over at Brown Eyed Baker sure has some hits in her repertoire...

Chocolate Chip Cookie Dough Dip 
(adapted from Recipezaar)

Ingredients
1/2 cup (1 stick) butter
1/3 cup brown sugar
1 tsp. vanilla extract
1 (8-oz) pkg cream cheese
1/2 cup confectioner’s sugar
3/4 cup semisweet mini chocolate chips

1. In a small saucepan, melt the butter with the brown sugar over medium heat. Stir continuously, until the brown sugar dissolves. (You can also do this in the microwave but watch it closely. The butter/sugar mixture will boil over fast. Stir every 30 seconds or so.)
2. Remove from heat, whisk in vanilla extract and set aside to cool.
3. Beat the cream cheese and confectioner’s sugar for 1 minute.
4. Slowly beat in the cooled butter mixture and beat again for another minute.
5. Stir in the chocolate chips.
6. Pour into a serving bowl and refrigerate.
7. Garnish with additional chips, if you choose.

Serve with wafers.

**Note: after refrigerating the dip it will be pretty solid and un-dippable so make sure to remove it from the refrigerator about 15-30 minutes before you plan on serving it, so it has time to soften up.

Before & After: Sideboards

While this doesn't really fit into the realm of feeding/entertaining or decorating for kids, it was way too good to not share with you. I know how much I love a before and after, and these are sooooooo inspiring! 
Before...


...and after! Amazing huh? Here's some more...


Get thyself to eBay now for your own DIY find!

Don't you just love a stripe?

Bold stripes are a sophisticated and timeless way to brighten up any kids space. Here's 4 applications that I think work really well. 

I would never have thought of doing it but don't those striped floorboards work a treat? 
How good are those stripey drawers? 

And we all know how I feel about a monochromatic colour scheme...
This is cool. I'd like some of these carpet tiles now please...

BOREDOM BUSTER #3: Top 7 -mostly FREE!

In Sydney: Kids in the Park 2010/11 
Kids in the Park is massive fun for kids of all ages – whatever their passion! Check out the amazing range of FREE activities on offer at Sydney Olympic Park these Summer holidays! 
*Australia Day celebrations
*BMX and Mountain X
*Brickpit Ringwalk
*Clue Trail
*Crack the Code
*Disc Golf
*Movies by the Boulevard
*Sports Star and Dancing Star
*The Amazing Chase
*Medibank International Kids Day
With over 50 activities to choose from at this year's Kids in the Park Summer holiday program, be sure to check out the other listings for more info: SPORTY activities, ADVENTURE kids, PLAYFUL kids, CREATIVE kids
Date:18 Dec 2010 - 30 Jan 2011
Location:Sydney Olympic Park, Sydney, NSW
Ages:All Ages / Family
Cost:FreeEvent 

In Melbourne: The Enchanted Party Fairy workshops for kids at ACMI
For little princes and princesses!
Princess Lilac and Princess Blossom take children on an enchanted adventure to undo a mischievous spell that's been cast over the garden. Activities on this spellbinding trail include craft, games, dancing and magic bubbles to help undo the spell. Each workshop runs for 45 minutes. Suitable for children aged 4-10 years.
Date: 21 Nov 2010 - 14 Jan 2011
Time:11am & 1pm
Location: ACMI, The Cube, Federation Square, Melbourne, VIC 
Ages:All Ages / Family
Cost: FREE - please register for your preferred session on the day
Event Info: (03) 8663 2583 Suitable for children aged 4-10 years 

In Sydney: Medibank International Sydney - Kids Day
The Medibank International Sydney 2011 promises to be one of the best tennis experiences in the nation. The eyes of the tennis world will turn to Sydney Olympic Park from 9-15 January as Serena Williams, Lleyton Hewitt, Gael Monfils, Samantha Stosur and many more serve up world class tennis action ahead of the Australian Open.  And Monday 10 Jan is Kids Day, where all children 16 years and under get access into the grounds and all the exciting activities on-site for free!
Date: 10 Jan 2011 - 10 Jan 2011
Time: From 10amLocation:Sydney Olympic Park Tennis Centre, Sydney, NSW 
Ages: All Ages / Family
Cost: U16s entry is FREE - Adults $9.90 Ground Pass
Event Info: Exciting on-site activities for under 16s and their families!


At home: Make an Erupting Volcano experiment
What You Need: Flour, salt, cooking oil, water, large bowl, plastic bottle, baking pan, red food colouring, liquid detergent, baking soda, vinegar, water
Activity: Mix 6 cups of flour, 2 cups of salt, 4 tablespoons of cooking oil and 2 cups of water in a large bowl. Mix the ingredients together with your hands until the mixture is firm. Stand the bottle in the centre of the pan. Mould the salt dough around the bottle in a cone shape (like a volcano) but leave the bottle top uncovered. Fill the bottle almost to the top with warm water. Add a few drops of food colouring. Squeeze 6 drops of detergent into the bottle. Add 2 tablespoons of baking soda. Slowly pour vinegar into the bottle. Your volcano will fizz and spurt red lava! Why? Mixing baking soda and vinegar makes a chemical reaction. 


Sydney & Melbourne: (Not free - but kind of amazing!)
Roar & Snore at the Zoo
Taronga Zoo's unique accommodation experience, Roar & Snore, has been re-launched. 
Roar ‘n’ Snore guests wine, dine and sleep where the elephants once walked, in the Historic Elephant Exhibit. After dinner in the Elephant House, guests explore the mystery of the Zoo after dark. Hear, smell, and see nocturnal creatures and share the passion, knowledge and stories of your camp hosts. 
After supper, retire to your safari tent for a restful night’s sleep. Wake in the morning to the calls of gibbons and birds and enjoy breakfast before a chance to meet the keepers and experience up-close animal encounters and life behind-the-scenes.
Cost includes snacks and nibbles, buffet dinner, dessert, tea and coffee, buffet breakfast. Twilight tour, behind the scene tours and fantastic photo opportunities. The chance to preview this unforgettable experience is truly once in a lifetime opportunity.
Vicitoria's Melbourne Zoo runs a Roar & Snore Event over the same period. Ticket prices are the same - See the web links below for details...
Date:1 Sep 2010 - 31 May 2011
Time:6:15pm - 9am
Location:Taronga Zoo, Sydney, NSW & Melbourne Zoo, Melbourne VIC
Ages:All Ages / Family
Cost:$195 Adults 
$145 Children (5–12 years)

Honourable mentions...
Sydney's Powerhouse Museum is always good for inexpensive, educational fun. At the moment they're running Tinytoreum - a collection based exhibition featuring Australian artists and authors. Have a look here for more details.
The Peats Ridge Childrens Festival - it started today and runs until New Years Day - jam packed with fun activities and performances for kids as well as their mums and dads. Have a look here for more details.

Make it: NYE Crackers

If you've got as many leftover christmas sweets lying around the house as we do, you're going to love this idea...
Step 1. Take your leftover choccies, lollipops and sweets
Step 2. Gather a collection of empty cardboard toilet rolls (you know, the centre bits)
Step 3. Add some shiny wrapping paper (there should be no shortage of this at the moment...)
Step 4. And finally, some confetti or shredded paper (but confetti works better)
Step 5. Fill each roll with confetti and sweets.
Step 6. Wrap each tube like a bon bon and tie with ribbon!
Voila! Crack away!

Make it: NYE Fondue

What could be more fun than a fondue to see in the new year? Even Martha says its the thing to do... But there'll be no double dipping!
Chocolate Fondue
Ingredients 
(serves 4)
300ml thickened cream
1/4 cup Cointreau liqueur
300g dark chocolate, finely chopped
fresh fruit, such as strawberries, orange segments, banana, raspberries and kiwifruit, to serve
250g packet marshmallows

Method
1. Heat cream in a saucepan over medium heat until almost boiling. Stir in Cointreau.
2. Place chocolate in a heatproof bowl. Pour hot cream mixture over chocolate. Stir with a metal spoon until melted and smooth. Pour into a warm bowl or small ceramic fondue.
3. Serve chocolate fondue with fruit and marshmallows.

Swiss cheese fondue
Preparation Time: 15 minutes
Cooking Time: 25 minutes

Ingredients (serves 8)
1 garlic clove
60ml (1/4 cup) brandy
1 1/2 tbs cornflour
375ml (1 1/2 cups) fruity white wine, such as riesling
1 tbs fresh lemon juice
750g Australian Gold Swiss Cheese, coarsely grated

Accompaniments
1.25kg Baby Coliban (Chat) potatoes, halved (see note)
200g thin salami slices
200g thin prosciutto slices
1 x 350g jar Always Fresh Baby Cucumbers (Cornichons)

Method
1. To prepare the accompaniments, cook the potato in a saucepan of salted boiling water for 8 minutes or until tender. Drain. Transfer to a warm serving bowl. Arrange the salami and prosciutto on a serving platter. Place the cornichons in a bowl.
2. Cut the garlic clove in half. Rub the cut surface of the garlic over the base and side of a fondue pot.
3. Place the brandy and cornflour in a bowl, and stir until smooth. Combine the wine and lemon juice in a heavy-based saucepan over medium-high heat. Bring to a simmer. Add the cornflour mixture and cook, stirring constantly, until the mixture boils and thickens.
4. Reduce heat to medium-low. Add a large handful of cheese. Use a wooden spoon to stir constantly until the cheese melts. Repeat with the remaining cheese, in large handfuls, stirring constantly after each addition, until the cheese melts and the mixture is combined.
5. Heat the fondue pot over a low flame. Transfer cheese fondue to the pot. Serve with the accompaniments and walnut bread.

Notes
You can prepare this recipe to the end of step 1 up to 30 minutes ahead. Continue from step 2, 15 minutes before serving. The fondue will still be a little lumpy at the end of step 4. This is normal and doesn't affect the flavour.
Recipe Via Good Taste Image via Martha Stewart

Party theme of the week: Build a cupcake bar

Any kind of bar at a kids party sounds like a winner to me (just kidding...), and this Build a Cupcake Bar idea is no exception. Amber from Enjoy Cupcakes put this together for a shower but the idea is a great one that can be applied to any party. In fact we were planning to do a similar them for H's 4th birthday with a Junior Masterchef twist but Rainbows won out in the end... (but I'll definitely keep it up my sleeve for future reference).


And have a look at Enjoy Cupcakes even cuter campervan! This is how they bring the party to you! In a restored vintage caravan. Could Amber be any more clever?

Very Smart Playhouses

Santa was thinking about buying H&N a cubby this christmas - but after looking into it, he decided our garden is a little small for what's on offer in the cubby house realm. However, if Santa had the option of picking up one of these divine little numbers locally, he may have chosen differently... 


These. Are. The. Goods. Designed and manufactured by a company called Smart Playhouse you can find them here - be warned tough - the entire site is written in Spanish. As my Espagnol is noh-soh-goot I have absolutley no idea how much they are or if they ship internationally... Anyone out there linguistically talented in the South American way please feel free to enlighten me on these minor points! I just LOVE these designs...

Nursery inspiration - Hello Yellow!

I guess deep down I must be a bit of a purist, though I hate to admit it! Usually the thought of anything but natural neutrals, pink or blue for baby's first space sends me into a panic. I recall a relative decking out their first arrival's room in a ghastly shade of bright spearmint green (think the likes of an '80's tennis outfit), which gave me a headache... And they wondered why they used to need to drive their babies to the rural outskirts of Sydney to settle them most nights!

BUT, in saying all that, this real room featured on Inspiration for Decoration has hit a colour happiness chord with me. Have a look and see what you think...
Loving the Jenny Lind cot, sunshine rug, pelmet-style decorative cornice

Loving the Eames rocker, decorative yellow drawer handles, Bianca Hall style print and duck-egg blue contrasting desk chair... And don't forget the lampshade! Divine!

Those drawer handles are a stunning and easy way to dress up a so-so piece of old furniture. Have a look here and here for a gorgeous selection of knobs to dress up your own piece...

We're back!

Not in a spooky Poltergeist-ey way, but in a ahhh, I'm sooooo relaxed - is it really all over? kind of way...

Hope you all had a spectacular christmas! We did. Christmas Eve would have to be my favourite night of the year. We spent most of it this year out on the back verandah in a flat-pack nightmare building a Junior Masterchef kitchen as quietly as possible. Our living room became a minefield of beautifully wrapped gifts of different shapes and sizes and stretched out in a two metre radius around the tree. We had my (overly generous) niece stay with us for a few nights as well so her contribution to the tree made for a scene from a christmas kids movie...


Here's my favourite scene from the silly season... It was taken Christmas night - straight out of the bath H made his way to the sofa and got himself comfy on top of the cushions on the back, and, the end. Don't you love them like this?

But now, back to the business of daily updates to keep your delightful wee ones busy, happy, safe, healthy and gorgeous. 

Some yum for your christmas leftovers...

Ok, so right now you're still up to your armpits in pork rind, but tomorrow night you'll be scratching your head wondering what in heavens name you're going to do with all the leftovers! That's where these gems are going to come into their own. Delicious Jamie Oliver recipes that'll make good use of your leftover christmas pork and turkey... Enjoy!

jamie oliver's turkey and sweet leek pie
serves 6 – 8 

ingredients
• 2 rashers smoked streaky bacon, roughly chopped
• ½ bunch of fresh thyme, leaves picked
• olive oil
• a large knob of butter
• 2kg leeks, washed, trimmed; white end chopped into chunks, green end finely sliced
• sea salt and freshly ground black pepper
• 800g cooked white turkey meat, torn into big chunks (brown too if you want)
• 2 heaped tablespoons plain flour, plus extra for dusting
• 2 pints turkey, chicken or vegetable stock 
• 2 tablespoons of crème fraîche 
• 1 x 500g packet puff pastry
• 12 jarred or vac-packed chestnuts, roasted and peeled
• 2 sprigs fresh sage, leaves picked
• 1 egg, preferably free-range or organic, beaten

This is dead simple, completely versatile and absolutely gorgeous. It’s not a pretty-boy pie; it’s a proper, old-school pie that everyone will be over the moon to see on the table. I’m putting leftover white turkey meat to good use here, but you could also mix brown meat in there too. 

Preheat your oven to 190°C/375°F/gas 5. Put your bacon in a large pan on a medium heat and add your thyme leaves. Add a lug of olive oil and the butter and let it all fry off a few minutes. Add all of your prepped leeks and fry them off for about 3 minutes so they are well-coated in the butter. Add a pinch of salt and pepper then pop the lid on top, turn the heat down to medium and let them cook away gently for 30 minutes, stirring every 5 to 10 minutes to make sure they don’t catch. There’s going to be enough moisture in the leeks to keep them happy in the pan so they should be soft and melt in your mouth once they’re done.

When your leeks are ready, add the turkey meat to them and stir. If you’ve got a bit of stuffing mixed in there you can put that in too. Add the flour, mix it in well then pour in your stock and stir again. Add the crème fraîche then turn the heat up and bring everything back up to the boil. Have a taste and add a bit more salt and pepper if it needs it then turn the heat off. Pour the mixture through a sieve over another large empty pan and let the wonderful gravy from the mixture drip into the pan while you roll out your pastry. 

Get a deep baking dish roughly 22 x 30cm. Dust a clean surface and a rolling pin with a bit of flour and roll your pastry out so it’s about double the size of your dish. Crumble the chestnuts over one half of the pastry then tear a few of the sage leaves over the chestnuts. Fold the other half of pastry on top then roll it out carefully and evenly so you have a rectangle big enough to cover your baking tray. Don’t worry if a few bits stick out here and there.

Spoon that thick leek mixture from your sieve into the pie dish and spread it out evenly. Lay your pastry on top, tuck the ends under then gently score the pastry diagonally with your knife. Add a pinch of salt to your beaten egg then paint this egg wash over the top of your pastry. Pop your pie in the oven for about 35 to 40 minutes or until the pastry is puffed up and golden brown. When the pie is ready, re-heat the lovely gravy and serve with your pie, along with some peas tossed in butter, lemon, salt and pepper and everyone’s happy! 


jamie oliver's green chilli pork
serves 4 

ingredients
• olive oil
• 800g pork mince, the best quality you can afford - (or just finely chop your leftover roast pork)
• 1 teaspoon dried sage
• sea salt and freshly ground black pepper
• 2 onions, peeled and roughly chopped
• 3 cloves of garlic, peeled and finely sliced
• 2 green peppers, deseeded and roughly chopped
• 6 small green chillies, roughly chopped
• 4 large ripe red tomatoes, chopped into small chunks
• 1 romaine lettuce, leaves washed and spun dry
• a small bunch of fresh mint
• 4 spring onions
• 1 packet of flour tortillas
• optional: 1 lime
soured cream or natural yoghurt, to serve

This green chilli is so delicious, simple to make and a total pleasure to eat. I think it’s cleaner, braver and fresher than your average chilli. You can make your own flatbreads or use tortillas, or you can even serve with chapattis or naans instead.

Put a large pan on a high heat and add a little olive oil. Add the pork mince, dried sage and a good pinch of salt and pepper. Use a wooden spoon to break the meat up a bit and stir it about, then cook for a few minutes, stirring occasionally (if you're using leftover meat that's already been cooked be careful not to overcook your pork or it will become quite tough - you just want to warm it through in this step). Add your onions, garlic, peppers and chillies, stir everything together, then fry for 15 minutes on a high heat until any liquid from the pork has evaporated and everything is starting to turn golden. When it looks good, stir in your chopped tomatoes and half a glass of water. Remember that it’s supposed to be quite dry (in a really wholesome and nice way), not stewy and wet, so don’t add too much water.

Turn the heat down to medium and let it tick away for 10 minutes or so while you wash and roughly chop up the lettuce. Pick the leaves from the bunch of mint and roughly chop them. Trim and finely slice your spring onions.

When you’re ready to serve your chilli, warm your tortillas in the oven at 180°C/350°F/gas 4 for a few minutes or in a dry pan for 30 seconds. Taste your dense chilli. More than likely it will need another good pinch of salt and pepper. If you want to give it a nice fresh edge, you can squeeze in the juice of a lime. Stir in half your chopped mint.

Push a warm tortilla or flatbread into each of your little bowls and spoon some delicious green chilli on top of each one. Top with your chopped lettuce and a dollop of yoghurt. Sprinkle over the rest of your mint and spring onions and serve right away with some cold beers.

Pink goes with...

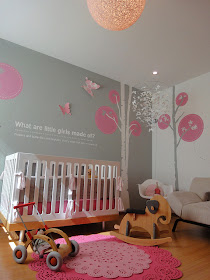
I've always liked pink and grey together - thought it was a stylish combination - but this takes that to a whole new level! Here's a stunning nursery design I found on Buy Modern Baby. Every square inch of it is absolutely delectable! I need this pink doily rug now! And that's just for starters...


Make it: 2 quick christmas craft ideas

Here's 2 last minute christmas craft ideas from the gorgeous girls at Babyccino Kids - just in case you've exhausted everything you had up your sleeve! These will get you through the last 2 days... 
Ok, so clearly this is an American idea and the longevity of your creation might be somewhat limited by the temperature - BUT I thought I'd include it here because it could be a lot of fun on a hot day to stand under your melting icicle and be showered with drips of cool water! You could put anything at all in the middle - it doesn't have to be leaves. What about cardboard cut-out shapes of Santa faces, christmas trees and candy canes? Or even really candy canes! That'd keep the little ones standing under their icicle till the last drip fell for sure! I like this idea. 

And what about a wooden clothes pegs for decorations? Have a look here for the instructions for both projects...

Blog Love: Feeling foodie

My family has a tradition of "taking turns" at having Christmas lunch/day at their house. This year is my turn. For some, the prospect of having 20 or so people rock up at their house and a 10kg turkey in the oven etc is something to be looked toward with fear and dread. I am not one of these people. I absolutely love it. In true last minute style, I've left my menu preparation till the last minute! But the good news is that I've found some fantastic food blogs (10 of them in fact), that you need to know about...

This is my new fave... TasteSpotting

And these run a close 2nd, 3rd, 4th, 5th....

One for the boys

Just to refresh your memories, I've been hunting down the perfect set of bunks for the boys. N is about to climb out of his cot and fall on his head, and H has just turned 4 so I'm thinking it's time to get out of the in-between size Ikea toddler bed and into a full size single. Ideally I've been looking for bunks that split into 2 singles - that part is pretty much taken care of now... But I'm still tossing around ideas for the overall look for the boys room makeover. Here's a few things that have caught my eye...
Loving the white on black skull and crossbones feature wall/mural idea... But doesn't the exposed brick texture set this off? 

Here's another great mural idea. This clever mum has used a projector to enlarge a line drawing of her little guys artwork onto the bedroom wall. How creative! Imagine how cool it would be to have your own drawing larger than life on your wall!

The cloud texture painted on the ceiling is clever in it's own right, but couple it with a suspended plane and you have a very strong yet simple space for young boys.

I think the first one is my favourite though. Tell me what you think! What do you love? What do you hate? I'm decorexic remember! I need your advice! It might be time for a mood board... I'll post it when it's done.

Make it: Dogs & worms for lunch!

This is the lunch I made for H&N today! It's H's new favourite meal (excellent parenting, I know...). As disgusting as it looks, it tastes surprisingly good ok. I thought it was really a bit clever when I first saw it (on a site I can't remember - eek! Sorry!). And it's really very easy to do! In fact, Hugh helped spike the frankfurts. Here's a step by step...
Step 1. Cut frankfurt into roughly 2cm lengths
Step 2. Spike through with raw spaghetti
Step 3. Cook in pot of water just on boiling point.
Step 4. Eat!

Tip: Use the thinest spaghetti you can find or your frankfurt skins will split and that just looks bad...

Party theme of the week: Up

How extraordinary is this lucky child's party theme?!!! I only wish I had the time to pull something like this off! Photographer, Wendy put this little soiree on for her daughter Bella's 7th birthday. The party was an outdoor movie night (complete with a white sheet for a movie screen and red velvet curtains in the garden...) and the detail Wendy has managed to incorporate into the event is just beyond amazing. Have a look at the photos and get your inspiration on!


And here's a link for a DIY tutorial to make your own balloon wreath like this one!

Have you been to a party this extravagant?